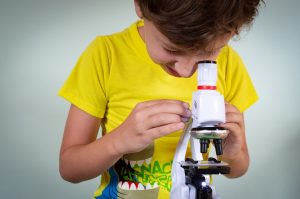
Although human beings have a well-developed sense of sight, we cannot easily see very small objects. In this lesson, we are going to explain the parts of the Microscope and its Functions in an easy way, for kids and other students.🔬
In the days before microscopes, it was not possible to see these very small objects or to know how living things were born. Scientists managed to understand how living beings were formed, recognize cells, discover and classify microorganisms, starting with the invention of the microscope.
What is the Microscope: Easy explanation for students
Table of Contents

What is a Microscope? The microscope is an instrument that allows you to place an object, illuminate it and obtain a larger image of it. With the microscope you can see what the human eye cannot normally see. You may have used a magnifying glass, which is a glass lens with a polished curved surface that allows you to see objects larger than life. 🔎
The microscope made it possible to improve what could be seen up to that moment with magnifying glasses. Both contain lenses that enlarge what is seen.
What is the difference between a magnifying glass and a microscope? With an ordinary magnifying glass you can see an object between 3 to 10 times larger. The light microscope, which uses two or more lenses that can magnify images about 1,000 times.
How Do Microscopes Work? Summary
Microscopes are devices that, through different lenses and adequate lighting, make small objects look larger. The type of lighting system and the intensity can be changed depending on the nature of the object that we want to observe so that it is seen with greater quality.
Regular microscopes consist of two types of lenses, an eyepiece lens and an objective lens, as well as a platform to place the object and an illumination system.

History of the Microscope
Who is the Father of Microscopy?
In 1590 Hans Janssen and his son Zaccharias, who was a Dutch eyeglass maker, designed an observing tube that magnified objects 30 times. He is also sometimes regarded as the inventor of the first microscope. However, the origin of the microscope, like the origin of the telescope, remains a controversial issue.🧐
In 1609 Galileo Galilei, an Italian astronomer, was not noted for his microscopic studies. He built the first telescopes that made it possible to see very distant objects. And he realized that by adjusting the lenses, objects that were up close could be seen even larger.
In Delf, Holland, a cloth merchant named Anton Van Leeuwenhoek (1632-1723) built lenses that allowed him to observe the quality of the weft of his cloth and to count the threads. He observed different objects and discovered tiny living beings which he called “animalcules“. He carried out studies on unicellular beings such as protozoa and bacteria, identified the red blood cells of human blood, the capillary system, the life cycles of insects, spermatozoa of animals.
Read also: Circulatory System

Who invented the Microscope?
For all these discoveries he is called “The Father of Microbiology“. His discovery was not relevant to the scientists of the time because Van Leeuwenhoek did not belong to the research community of the time, nor did he speak Latin.
Later, Regnier de Graaf, who was a medical student, translated the works into Latin and made them known. This invention is usually attributed to Anton Van Leeuwenhoek, but really Zaccharias Janssen and his father were the ones who made the first microscope.
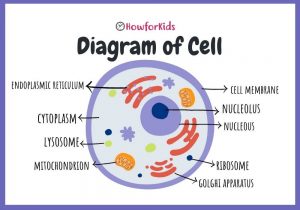
Cells: Discovery related to the Microscope
In 1655, the English scientist Robert Hooke first used the word “cell”. Observing cork sheets with an optical microscope, he discovered that there were repeated hexagonal cavities similar to those of a hive, which he called cells or “cells”, from the Latin cella, which means hollow. With this, the study of cells began, which are the units that constitute all living beings. Later he published his book Micrographia. Without the microscope it would not have been possible.
Also read: What is a cell? Parts and Functions
Types of Microscopes for Students
Over time, the ability of microscopes has been improved. There are different types of microscopes. They are distinguished by the magnification capacity of their lenses and the light sources they use. The most common is the Optical Microscope or “light” microscope, which uses light to produce the displayed image.
• Simple Microscope: It is the most basic microscope that uses a single lens to magnify the images of the observed objects. The most classic example is the magnifying glass. It has only 1 lens.
• Compound Microscope: It has a system of two or more lenses and a light source to magnify the sample. The lenses are the eyepiece, which is the lens that is closest to the eye, and the objective, which is the lens that is closest to the object. Both lenses have their own magnifications. This microscope is used to enlarge between 40 and 1500 times. There are other types of microscopes that use other types of energy than light.
• Electron Microscopes replaced photons of light with electrons and lenses with magnetic fields. They allow images to be enlarged two million times. With this microscope it is possible to see the inside of the cells.
• The Digital Microscope connects to a computer to view images on the monitor. These images can be converted to files and saved. The operation is similar to the rest.
Other types of microscopes are for example: Ultraviolet light microscope, fluorescence microscope, polarized light microscope, those that use X-rays, gases and lasers, among others.
Different Kinds of Microscopes and their Uses
The Compound Light Microscope
The standard light microscope uses two powered lens systems. It works by magnifying the image of objects placed on the stage up to 1,000 times. It allows you to see very thin objects. It consists of a hollow tube with two lenses. The lens (which is called “objective”) receives the light that passes through the sample and the eyepiece is where the image is viewed. In general there are three objectives with different magnifications that rotate on a plate. The sample to be observed rests on a glass slide and is covered with coverslips that are placed on the stage. The stage has clamps to hold and a hole through which the light passes. And the focus screws allow the image to be seen more clearly.
Electron Microscope
The electron microscope allows you to magnify the image of an object up to 100,000 times. It uses electrons instead of photons or visible light to form images of tiny objects. Electron microscopes allow higher magnifications to be achieved, because the wavelength of electrons is much shorter than that of “visible” photons.
Digital Microscope: What is it for?
The digital microscope contains a small digital camera connected to a computer via a USB cable. Images viewed through the eyepiece are displayed on the computer screen and can be saved as an image or video. In scientific research, extensive advantages over conventional microscopes are highlighted. Images can be saved or printed for close examination, they can also be connected to a projector.
Microscope Parts and Functions

Mechanical Parts of Microscope
• Ocular Lens / Eyepiece: They are the lenses located close to the viewer’s eye whose function is to enlarge the image of the objective. When they have two eyepieces they are called binoculars, if they only have one they are called monocular.
• Objectives: These are the lenses located near the object or preparation to be observed. They may have three or four interchangeable lenses with different magnifications.
• Stage / Platen: It is a flat platform where the slide or specimen to be observed rests for viewing. It has a circular opening in its center that can be adjusted via the coarse and fine adjustment knobs.
• Focus Screws: Allows you to move the lenses in or out until you get the correct focus and sharpness.
• Light source: Some have electric light, others have a mirror that reflects external light illuminating the preparation.
• Condenser Lens: It collects the light from the illuminator and focuses it on the specimen.
• Diaphragm / Iris: Regulates the amount of light that reaches the condenser. It is an adjustable instrument located below the stage which can be manually modified to vary the intensity of light that reaches the specimen.
• Stage clips: Used to keep the slide in place.
• The optical tube: Which can be moved closer or further from the preparation.
• Arm: It is the structure that connects the base of the microscope to the nosepiece and eyepiece; used to carry the microscope around.
• Base: It is a structure of the microscope that serves as its foundation.
How to use the Microscope
The microscope is widely used in research, in clinical analysis laboratories.
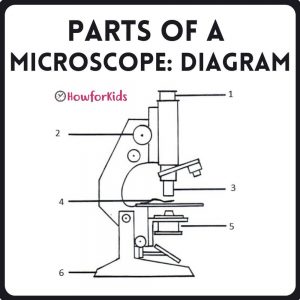
- Ocular Lens (eyepiece)
- Focusing Knob
- Objective
- Slide with specimen
- Condenser
- Base
First Step: Sample Preparation
When you want to observe groups of cells or microorganisms under a microscope, the material must be previously prepared correctly. The material we wish to observe is called a sample.
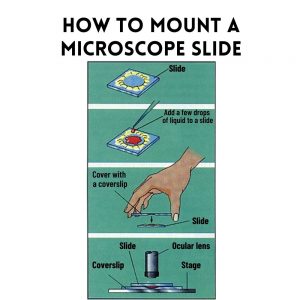
How to Mount a Microscope Slide
Specimen preparation is important in any microscopical technique with proper preparation methods facilitating examination and interpretation of microstructural features. With the microscope you can observe elements that allow light to pass through them. To do this you must put together a “preparation”. The purpose is that the light passes through the sample, so you must cut a very fine “film”, as thin as possible, of what you want to observe. The idea is that the cells do not crowd and can be seen well. If the sample is transparent, it can be stained with a few drops of dye to facilitate observation. You leave it for a few minutes, then you must wash it, to remove the excess dye.
How to use a Microscope Step by Step
• Step 1: Place the sample you want to observe on a piece of rectangular glass called slide and cover it with a much thinner and smaller piece of glass called a coverslip. Very carefully so that there are no trapped air bubbles.
• Step 2: Sometimes, depending on what you want to see, you can add a few drops of liquid between both glasses (slide and coverslip).
• Step 3: Now turn on the microscope light, which should be plugged in.
• Step 4: Place the prepared sample between both glasses on the microscope stage and hold it with tweezers. You can search by turning the revolver, the corresponding objective.
• Step 5: Focus the sample always starting with the objective of lower magnification.
• Step 6: Adjust the screw until the target is close to the sample.
• Step 7: Examine the sample through the eyepiece, at different magnifications by changing the objective, turning the nosepiece and adjusting the focus with the adjustment knob.
Impacts of the Microscope on Science and Technology
Why is the microscope important in the medical industry?
The microscope is an instrument used to enlarge the images of small objects so that they can be easily observed. Currently there are microscopes of different types and with different specifications that adapt to all uses and needs.
The invention of the microscope has had a great impact on the field of medicine. Doctors use microscopes to detect abnormal cells and this helps in the prevention, identification and treatment of diseases.
But you should know that the applications that are given to the microscope are not exclusive to the medical field. Believe it or not, they are being used for many activities that you can’t even imagine!
Importance of the Microscope
Benefits of the Microscope for Humanity: Currently the microscope is used in the following ways:
• Scientific Laboratories: Entomologists, paleontologists, marine biologists, histologists, geneticists, among others, use them in research.
• Studying atomic structures (the surfaces of individual atoms)
• Engineering Workshops: To examine tools and circuits.
• Agriculture and horticulture: For the identification of pests, insects and plant diseases.
• Veterinary Sciences: Pest control to identify diseases such as small ticks.
• Product Quality Management Systems: Verification of the quality of different products.
• Examining Forensic Evidence: Collect and analyze evidence to identify documents.
• Medical Science
• Dermatology: Tissue Analysis. Application to identify skin problems.
• Otolaryngology: To examine the inner ear.
• Dentistry: To examine teeth and oral problems.
• Education: The digital microscope can be connected to a laptop and projector so students can view the sample.
• Textile industry: To verify the quality of fabrics and fabric fibers.
• Art: It is used for the restoration of works in art galleries, tattoos.